Egg Saravle Recipe | Sweet Saravle Recipe

Saravle, sarole, sarawle, sarawley kokni pasta, kokani pasta, kokani muslim cuisine, how to make sarole, how to make saravle, how to make sarawley, konkni pasta, saravle recipe, kokni muslim recipes, konkani muslim food, kokani cuisine, kokni muslim cuisine, kokni cuisine, kokani culture, kokni culture, konkni culture and food
Photo Courtesy : Asma Dhanshe
Sweet saravle - a sinfully yummy, rich and easy to make saravle are served to special guests here in kokan. Also this version of saravle is a popular breakfast and evening snack. Eggs can be dropped over the saravle the way it's done in the pic or you can add boiled eggs but I prefer dropped ones with lots of cardamom powder and saffron on top! 😋

Sweet Saravle Recipe:

500 gms saravle
100 gms pure ghee
1 cup full cream milk
1 cup freshly squeezed coconut milk
1/3 cup sugar (or as per taste)
A pinch of Salt
2"x2 cinnamon sticks
5-6 green cardamom pods
3 eggs (preferably organic)
Slivered almonds and pistachios
1/4 teaspoon saffron
Cardamom powder to sprinkle on eggs

Method:

1. Heat pure ghee in a heavy bottomed pot. Add cinnamon sticks and cardamom pods and roast saravle till just fragrant.
2. Add milk, coconut milk, sugar, salt and saffron and stir with wooden spoon and let it cook covered. Add a little water if needed.
3. Finally add slivered almonds and pistachios and break eggs. Sprinkle cardamom powder and let it cook covered on very low flame till eggs are completely and there's no raw smell. Serve hot!

Chicken Saravle Recipe


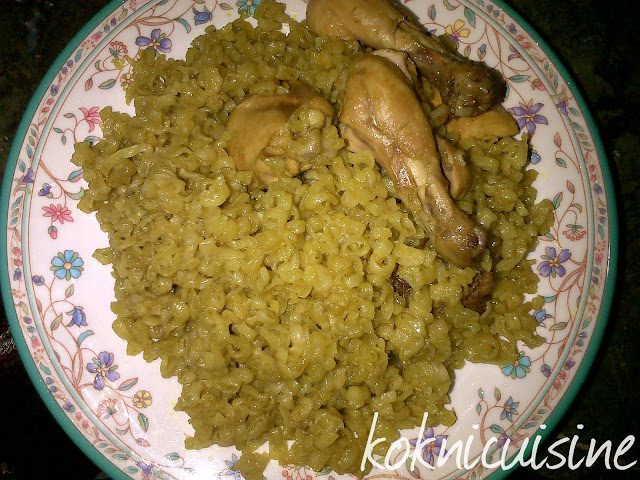
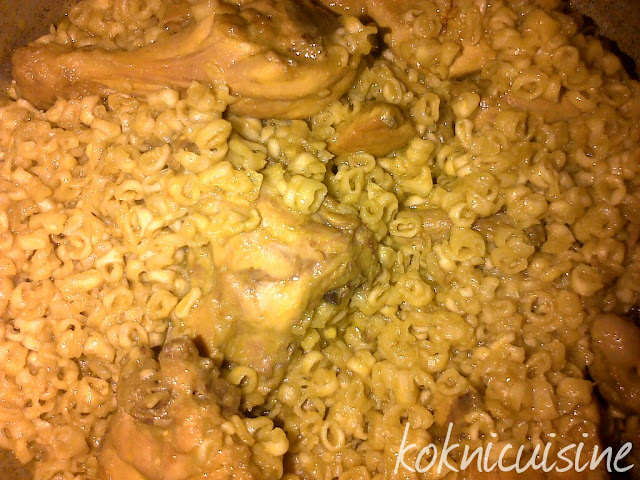
Chicken saravle is a must have in Eid brunch at my place along with sheer khurma and saandan (recipes on the way!). This is that one dish I can live my whole life on! Chicken saravle are so sinfully rich in flavours that you just can't resist them. Besides the taste they're also packed with nutrients and will make you feel stuffed in just a few bites. We usually pair chicken saravle with alnipani (the salt free chicken clear soup) for brunch on weekends and that's our most favourite comfort food. Just yummy!! So here is the

Recipe of Chicken Saravle


Ingredients:

1/2 kg saravle
1 whole chicken(preferably organic) cut into pieces
2 medium sized onions
2 tablespoons ginger-garlic paste
1/2 teaspoon Salt (as there's salt in saravle already)
3×2" sticks of cinnamon
12-15 black peppercorns
1-1/2 teaspoon fennel seeds powder
1/2 teaspoon turmeric powder
1 tablespoon sugar
3 tablespoons pure ghee
1 cup coconut milk
1/2 cup water

Method:

1. Clean and wash the chicken pieces and keep aside.
2. Peel wash and make paste of the onions using very little water.
3. Heat pure ghee in a heavy bottomed pot. Then add cinnamon sticks and black pepper corns. Sauté onion paste till pink then add ginger-garlic paste and add fennel seeds powder, turmeric powder, salt and sugar mix well and then add chicken pieces and stir fry till chicken turns white. Keep the flame medium to low. Then add coconut milk and water, cover and let it cook till chicken is almost done.
4. Finally add saravle and mix carefully with wooden spatula till everything is well coated with masala. Cover and let it cook on very low flame for 15-20 minutes. The saravle should be soft and done by now. Turn off the flame and serve warm.

Saravle - Kokni Style Pasta (Tiny Rings)


Saravle..

While I was searching Web to check if there's anything written about this famous kokni pasta I came across these words, "a poetry worthy food" wow!! I mean that's so true! Though I dont know the ABCD of poetry but these tiny rings will make you fall in love by just looking at them and then when they melt in your mouth it's like heaven! Hahhaha.. anyway, saravle is no doubt one of the best foods I have ever eaten. I like both sweet and savoury versions equally.
Though you can always buy the prepare saravle that are sold locally and cook the way you want but you can also make your own saravlas at home which needs skills but not too difficult a task though. You just need to make a perfect dough, make thick vermicelli through the vermicelli sieve and then roll them on saravle sticks to make rings and and then let them dry in sunlight. Once hardened (takes just 2-3 hours) you can store them in air tight jars and containers. You can roast them a little before storage or roast them lightly before cooking to get that nice golden colour.

Though I have never made the saravle but I have got these methods to prepare saravle from some experts who sell them locally at very reasonable rates. There are three types, I was told;

1. Wheat flour saravle
2. White flour saravle
3. Semolina saravle

1. For wheat flour saravle just make a stiff dough using what flour, salt and water and leave it covered for 1-2 hours.

2. For maida saravle mix maida (white flour), salt and water. You can add semolina in 1:4 proportion. Leave the dough for at least 3 hours. The dough shouldn't be very soft.

3. For semolina saravle, soak semolina in water for over night then add salt and knead the dough. The water quantity should be half of that of the semolina quantity.

Preparation:
Make the balls out of dough and pass then through vermicelli press and then roll them on saravle sticks. (These wooden sticks are available in the markets of kokan and mumbai) remove the rings carefully from the sticks and spread on a flat thali and keep in sunlight for 2-3 hours. Your saravle is ready!

If the task sounds too hard go for pasta maker and get it done through the machine.

But again buying readymade saravle is the easiest option! 😜

Now go enjoy the Sweet and savoury recipes with these saravle.

Rice and Semolina Steamed Cake (Bhanori Recipe)


I was browsing about kokni muslim cuisine and saw this name on 'bhanori' on Wikipedia along with saandan and baitho ghavno and I got curious that what it must be as the name was new to me. And to my surprise, a few days later, the same recipe was discussed in a WhatsApp group. And that's where I got the authentic recipe and then I decided to give it a try on the same day. Fortunately, I had all the ingredients available so I just prepared the batter, covered it and left it unattended for approximately 8 hours and then preceeded with steaming the cake. I was so happy with the results that I just couldn't wait take photos and shared in the group immediately. 😆


How to make Bhanori:

 Ingredients:

1/2 kg rice flour
1/4 kg semolina
200 g (one small bowl) shredded coconut
1/4 kg sugar (or little more as per your liking)
1/4 teaspoon salt
3 eggs
1/2 cup milk
1/2 teaspoon yeast
1/2 teaspoon cardamom powder
1/4 teaspoon saffron
3 tablespoon blanched and slivered almonds and pistachios

Method:

1. Break and beat eggs in a large bowl then add all the ingredients one by one except yeast and mix well then add yeast and cover the batter and keep it for 8-10 hours or overnight.
2. As batter is ready to cook, grease a pan and pour the batter. Garnish with almonds and pistachios and place the lid and let it cook on very low flame till it's done thoroughly.
3. Cut into pieces and eat. 😋 you can store bhanori in fridge for a week. Just shallow in better or ghee before serving.

Roasted Cashew Nuts - a healthy snacking option

Salt free 100% healthy roasted cashew nuts 😋😋

Roasted nuts with a cup of nicely brewd chai or perfectly done coffee and some good company is all I want on a dull winter evening. I strongly feel that all these salt loaded nuts are NOT so healthy and just an indulgent snack it's even worse when we have them with sugar and cream loaded coffee.

A pic from our last mini get together 💗


But again we koknis being health conscious we prefer going salt free and organic even while snacking. Being blessed with plenty of cashew plantation in the region we easily these raw dried cashew beans with shells


Which are then roasted on an open fire till the outer skin is charred like this


Then the charred skin is removed from the nuts that still have that thin inner skin which you can remove while eating the way you do with chana-Seng. Enjoy you salt free, organic healthy treat! ☺


How to make Chawal ki Roti | Rice Flour Roti Recipe | How to make Bhakri


If you don't know how to make chawal ki roti, you know nothing about kokni style cooking! That's the norm here in the community and every girl when reaches marriageable age is taught to make chawal ki roti though many fail to do it on hands but then the roti press or belan comes to the rescue. The traditional way of making rice flour roti requires a cast iron tawa and a lot of skills and of course patience!! You can't learn to make roti in a day or two, you need to practice for days or even months to get perfect thin and soft rotis that are roasted evenly without any dark burnt spots. I am still learning and every time I show a lot of enthusiasm to make roti on hands but end up having a cracked edged something that can't be placed on hot tawa lol so obviously I go with roti press. :p
Anyway, here I am presenting how they make Rice Flour Roti:

You'll need;

1 cup rice flour

1/2 cup water + for kneading

Wooden spatula

Cast-iron griddle

Parat (a wide steel or aluminium bowl used for mixing the dough)

A metal spatula for flipping rotis

Directions:

1. Take 1/2 cup water in a  pot and and let it boil vigorously then quick pour in the flour and turn of the flame and immediately start mixing with the help of wooden spatula (known as daav). You gotta be really quick here. It should look like this

2. Take the dough in parat and knead it well using a water little by little till it becomes a soft dough.

3. Now take a little dough enough to make a standard size roti and knead again to make it pliable. Take this ball in left hand and pinch it to make a 3-4" wide disc using middle and index fingers and thumb of right hand. Once it is wide think enough to hold between your palms start flattening it the way this lady is doing in the picture

4. Meanwhile heat the tawa till it very hot. Once the roti is thin enough place it on the tawa. You can grease the tawa with just dash of oil to avoid roti from sticking to the tawa. Let the roti cook on one side till the upper surface is all dry then flip with metal spatula and let it cook it nicely done them flip again and let it puff up. Then remove from the tawa. To keep roti soft keep them in bamboo basket covered in soft kitchen napkin. Enjoy with you favourite kokni dishes.

Photo Courtesy: Google

Featured post

Sheerkhurma | Doodh Sev

Imagine Eid morning at your home.. can you smell sheerkhurma already? :D In kokan and I think in many parts of the subcontinent, Sheerkhur...